Here are some Simple Methods for Using a Document Object Model in JavaScript: To begin, First refer to – document-object-model
Verifying the Type of the Node
You can utilize the nodeType property, which returns a numeric constant that represents the node type, to confirm the node type in the DOM. The DOM specification specifies a corresponding numeric value for each type. The nodeType property can be used to verify a node’s kind, as shown in this comprehensive example.
<!DOCTYPE html>
<html>
<body>
<h1>The Element Object</h1>
<h2>The nodeType Property</h2>

<p id="myP">Click the button to get the node type of this element.</p>

<button onclick="myFunction()">Try it</button>

<p id="demo"></p>

<script>
function myFunction() {
  var x = document.getElementById("myP").nodeType;
  document.getElementById("demo").innerHTML = x;
}
</script>

</body>
</html>- The use of nodeType with an interactive button is shown in this example.
- An element node, as described by the DOM, is represented by the number 1.

Figure 1 – Displaying the Output of Checking the Node Type

Figure 2 – Displaying the Output of Checking the Node Type after clicking button
This example shows how to check the type of a DOM node using JavaScript’s nodeType property. Upon clicking the button, the paragraph element’s nodeType (<p id=”myP”>) is retrieved by the myFunction() function to be an element node with a nodeType value of 1. The outcome is then shown in another paragraph (id=”demo”). This demonstrates the use of nodeType to distinguish between various node types in the DOM, where 1 denotes an element node.
Verifying the Child Nodes of a Node
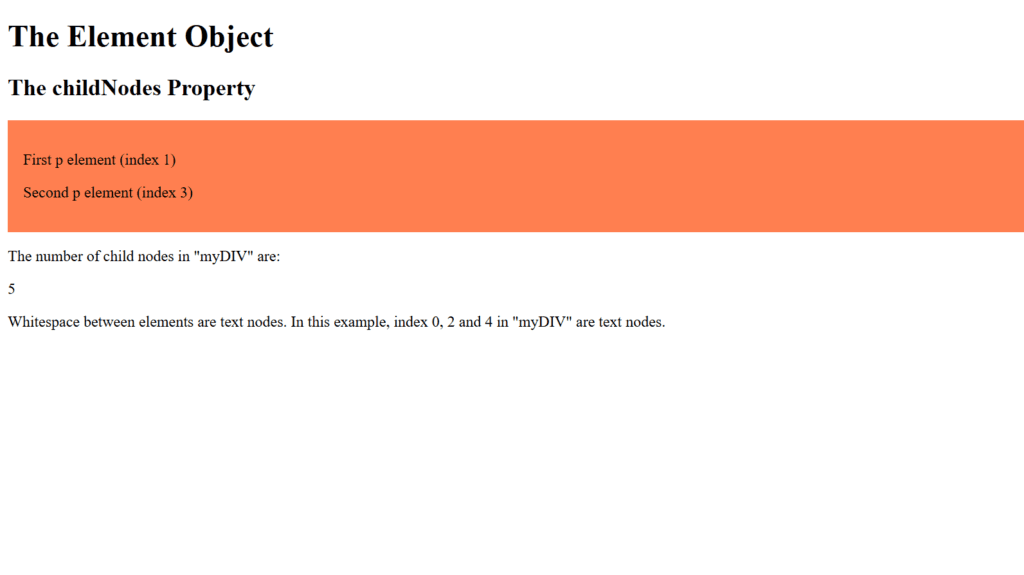
This example shows how to count and show the number of child nodes of an element with the id=”myDIV” using the childNodes attribute. These child nodes can be either element nodes, text nodes (including whitespace), or comment nodes. All of these child nodes are included in the childNodes attribute.
<!DOCTYPE html>
<html>
<body>
<h1>The Element Object</h1>
<h2>The childNodes Property</h2>

<div id="myDIV" style="background:coral; padding:16px;">
  <p>First p element (index 1)</p>
  <p>Second p element (index 3)</p>
</div>

<p>The number of child nodes in "myDIV" are:</p>
<p id="demo"></p>

<p>Whitespace between elements are text nodes. In this example, index 0, 2 and 4 in "myDIV" are text nodes.</p>

<script>
const element = document.getElementById("myDIV");
let numb = element.childNodes.length;
document.getElementById("demo").innerHTML = numb;
</script>

</body>
</html>
Figure 3 – Displaying the Output of Checking Child Nodes of a Node.
This example shows how to count each child node of an element using the childNodes attribute. Between the two
components in the myDIV element, the whitespace is seen as a text node. In a paragraph, the JavaScript code shows the total count, which is five and includes element and text nodes, after retrieving the child nodes of myDIV. The fact that childNodes counts all nodes, including element and text (whitespace) nodes, is demonstrated by this.
Changing the Text of an Element
JavaScript allows you to modify an HTML element’s text by utilizing the textContent or innerHTML properties. While innerHTML enables you to modify both text and HTML content, the textContent property is usually used to modify the text inside an element. Here is a comprehensive example showing how to use both approaches to modify an element’s text:
<!DOCTYPE html>
<html>
<head>
    <title>Change Text of an Element</title>
</head>
<body>

    <h1>Change Text Example</h1>

    <p id="textParagraph">This is the original text.</p>

    <button onclick="changeText()">Click to Change Text</button>

    <p>Click the button to change the text inside the paragraph element.</p>

    <script>
        // Function to change the text of the paragraph element
        function changeText() {
            // Get the paragraph element by ID
            const paragraph = document.getElementById("textParagraph");

            // Change the text of the paragraph using textContent
            paragraph.textContent = "The text has been changed!";

            // Alternatively, you could use innerHTML if you wanted to include HTML:
            // paragraph.innerHTML = "The <strong>text</strong> has been changed!";
        }
    </script>

</body>
</html>
Figure 4 – Displaying the Output of Changing the Text of an Element

Figure 5 – Displaying the Output after Changing Text of an Element
This example shows you how to use JavaScript to modify the text of an HTML element. When a button is clicked, the changeText() function is called, selecting a paragraph element by its id and updating its text using the textContent attribute. “The text has been changed!” has been added to the text. As an alternative, you can change both HTML content and text using innerHTML. This demonstrates an easy method for dynamically changing the content of webpage elements.